Sunday, 17 January 2010
Endives: savory bread & other ideas
Thursday, 14 January 2010
Seville oranges
Sunday, 10 January 2010
Still more of the pig, in all its glory ...
- pick up our dearly beloved daughter and
- check out some likely spice shops
Still, on the bright side we managed to find Rajah Bazar (recommended for its selection of spices, dried pulses, Marmite and comprehensive collection of at least 5000 Bollywood DVDs), World Market (good spice selection, great line in hair extensions) and Saigon Store (need any frozen prepared Vietnamese or Thai food? Go there) whilst freezing our arses off. And I do it all for you. Without even a drink at the end of it, in this case.
We also made it to The Cake Shop at 11 rue Thiers, who will do marvellous personalised birthday cakes with proper icing and everything, stock a great range of cooking implements (if, for you, "cooking" = "patisserie") and also have a seemingly endless stock of Philadelphia cream cheese. Which is the only true base for a real cheesecake, although in these benighted parts we've been forced to make do with Samos 99. And I also found a Christmas present for Sophie - some rather exotic chocolate and a slim volume entitled "Erotic Recipes for Lazy Women" (reads better in French - "Les Recettes Erotiques de la Paresseuse").
The young English lad who gift-wrapped it for me seemed quite embarrassed - at least, he took some time doing the wrapping. Maybe he was flicking through it.
What I'm leading up to is that I'm really quite looking forward to dinner in a couple of nights - should be, seeing as I started it yesterday. It is, of course, a jarret de porc braisé, aka jambonneau, aka pig foreleg. This may seem cruel, I know, but no part of the pig goes to waste - and in any case, whenever I see the little chap (an odd term for a one-tonne porker) hobbling around on three legs and a crutch I always give him a friendly wave, just to say thank you. I think he appreciates it.
On the other hand, the next time we have this I shall have to seriously think about chipping in to buy him a skateboard or something to slip under the front, 'cos I'm not sure he'll manage too well with two crutches.
The recipe is simplicity itself, although it does help if you have a wood-burner. Mind you, you could certainly do this in a crock-pot or slow-cooker or whatever.
First of all, you need to obtain a pig's foreleg. You could either go down to the supermarket or go see your friendly local butcher (whom you really should cultivate, he is your friend) and get one, or you could go the DIY route late one night with a chainsaw at a pig farm, that's up to you.
Whatever, having done that you really need to brown that on all sides in yer trusty cast-iron poele, then fish it out and fling in a sliced onion, ditto carrot, and a teaspoon or so of juniper berries. Let them slowly sweat in the fat for ten minutes or so, then put the pig back with a bayleaf or two, sprinkle with a bit of five-spice powder and maybe a pinch of ginger, and let it all continue sweating away. For another ten minutes.
At the end of such a long wait it's always a good idea to add some alcohol. In Alsace they'd add some pinot noir: I'm not in Alsace and I didn't have any so I used the last of some rather nice beer and chucked in a couple of sugar cubes. (Quantities may vary. I had about that much beer left, so that's what I used: two 130ml glasses of wine should be fine.)
Bring it to a simmer and let it fester, uncovered, for ten minutes more whilst you consider the rest of the wine and your options concerning it, then cover and let it cook slowly for another three hours.
As an aside, some recipes advise you to wrap your jarret in a teatowel once it's browned, to avoid it "decomposing" (ie falling apart, not going rotten) during cooking: I can't be arsed, you can't get the stains out of the teatowel, and in any case I've never had that happen to me anyway - just be delicate when you stick the fork in to turn it over (as you should do from time to time).
Once all that's done, you should have a very soft hunk of meat on the bone sitting in its own juices: put it aside somewhere until you really want to eat it. Preferably within the next couple of days, otherwise it's an open invitation to whatever bacterial toxin happens to be flavour du jour.
When the time comes, stick the jarret in an oven dish and - surprise! - stick it in the oven, ladling a few spoonsful of its juices over it as you do so. There'll still be lots left, and I would personally cook dumplings in it to go with the meat, but Margo doesn't like dumplings so there you are. If you don't like dumplings either, you'll just have to reduce the juice to about half so it goes thick and syrupy. Either way, pour some juice over the meat every ten minutes or so whilst it finishes cooking for the next hour, so it gets nicely glazed and caramelised.
At the end of this time the meat will be falling off the bone and practically sitting up and begging to be eaten, so you'd better get on to that. Dumplings go well with it (did I mention that?) and green vegetables of your choice - around here that's broccoli or brussels sprouts, you could probably get away with peas.
Dessert is up to you - we had blackberry and apple tart tonight, and I think I can recommend that. Might not be an option if you've no blackberries in the freezer, mind you. I'm sure you'll think of something.
Friday, 1 January 2010
Things to do when it's pissing down ...
Down here in Saint-Pierre, it means that the day (well, afternoon) is ahead of us and nothing much to fill it apart from cooking, eating and drinking, although not necessarily in that order. And quite frankly, nothing incites me to commit baking as much as the combination of a warm cosy kitchen and gray miserable weather. Just the thought of how the kitchen is going to smell gets me all excited.
So given that you're unlikely to be out of bed and capable of coordinated movement much before midday, something to get done during the afternoon would be some spice cake - pain d'épices. Unfortunately I'm the only one around here who really likes the stuff, as Margo is apparently capable of detecting one part per million of anis in anything and it really puts her off. On the other hand, the star anis in Chinese food doesn't seem to bother her ... go figure.
Whatever, pain d'épices is a seasonal thing and has the great advantage of keeping well - in fact, it tastes better after at least a couple of days maturing. You will need a large, high, square cake tin: I would suggest you butter it and line it with waxed paper because otherwise it'll be a right bugger trying to get the cake out when it's cooked.
Getting the cake tin ready is probably the most complicated part of the recipe. For the rest, you just need to:
- put 200 gm honey, 125 gm sugar, 80 gm butter and 20 cl of water into a small saucepan and bring to the boil to dissolve everything
- mix together in a small bowl the zest of an orange and the zest of a lemon, 50 gm slivered almonds, 1 tsp anis seeds and the chopped peel of an orange
- mix together 275 gm of flour (can use rye flour if you like, in which case you may need a bit more as it tends to be gloppy) and 2 tbsp baking powder in a large bowl
(Do note that if, like us, you have an old woodburner in the kitchen, you can forget about the temperatures: just get the fire burning nice and hot and put the cake in "until cooked". Believe me, it's how it used to be done.)
Once that's underway, or out of the way, it'd be a good idea to think of dinner. And I think that diots au vin blanc are rather nice, even if no-one else does. (This is turning into rather a selfish entry, isn't it?) Diots are a Savoyard speciality: they are basically pure pork sausages; chunks of pig ground coarsely with their own fat (a 50/50 mix is about right) and stuffed firmly into the poor animal's intestines, then hung to dry (or some smoke them - in fact they used to be hung to dry in the chimney, so you got both for the same price).
If you're going to try this, do go and get decent sausages: eschew those with breadcrumbs or coyly unspecified "other ingredients". Go find a bloody good butcher who makes his own, or you might be lucky enough to find a farmer who does sausages ... or you could do your own. It's not that hard.
Anyway, the only other thing that might be considered exotic about this is the sarments de vigne, or vine shoot clippings. I have no trouble finding these: I just have to wander down to the garden with a pair of secateurs in the hip pocket, slip through the barbed-wire fence into the paddock behind, and in five minutes I've all the clippings I'll need. You may have a bit more difficulty.
You start by browning the sausages evenly in a hot, heavy saucepan. No extra fat is required, just start them off slowly and then turn the heat up and they'll render all that's required. When nicely brown, fish them out, turn the heat down and fling in a sliced onion and a sliced carrot: when the onion starts to go transparent it would be a good time to add some thyme, some squashed juniper berries, maybe a bit of rosemary and a bay leaf or two. After a minute or two, sprinkle a tablespoon of flour over it and stir it around, then pour in a glass of beef stock and two (or three) glasses of white wine.
If you want to be obsessional about things it would have to be a Jacquères, I'm not that worried and in fact the real point is that there's still at least half the bottle left, and that will need to be dealt with at some point. Just saying. (Come to that, you could use a Mondeuse if you want. It'd come out as diots au vin rouge, but who cares? You'll still have the rest of the bottle to take care of.)
Bring that to the boil and then - and this is the tricky part - you need to build a little sort of mesh or raft of vine clippings over the liquid, on to which you place the sausages before putting the lid on the saucepan. The object of the exercise is to have the sausages (which are already browned, remember?) steam in the alcohol and water vapour, rather than simmer in the sauce. It also gets rid of a fair bit of fat (not that it goes that far, it'll wind up in the sauce) as it slowly melts during the cooking, bastes the sausages from the inside, and then drips onto the onions and wine ... oh, and the tannins and things from the vine shoots sort of intermingle with the wine and stuff like that. Sounds a bit New Age to me, on a par with knitting your own yoghurt.
After about 45 minutes simmering on top of the woodburner fling in some potatoes, peeled (or not) and cut into chunks so that they too can steam and get slightly drunk: 45 minutes more and you can probably eat it. Personally I just remove the vine shoots and then serve the whole lot from the saucepan: this is not an elegant dish and there's no point in trying to make it so.
Finally, I'll leave you with this one: the galette des rois. Traditionally it's served on Twelfth Night, the kings arriving too late for mince pies and steamed Christmas pudding with brandy sauce, but it doesn't really matter.
This unfortunately calls for about 400gm of flaky or puff pastry. You can either buy 2 x 200gm rounds of the stuff or make it yourself: the only advantage of doing the latter is that at least you know there's nowt but butter in it. But it takes about two hours rolling, folding, and waiting for it to chill out in the fridge - I suppose you can at least drink while you're waiting.
Assuming that you have, one way or another, procured yer flaky pastry, I'd start by making some sugar syrup, which is simple enough: boil hell out of 8 clof water and 50 gm or so of sugar until it goes ... well, syrupy. Leave that on a low heat and add the zest of an orange, finely chopped: let it sit and simmer for ten minutes. While that's happening, get the frangipane ready: knead together 100gm of powdered almonds, 50 gm of softened butter, 50 gm of sugar and a shot-glass of Grand Marnier (or Cointreau if that's all you've got). When that's done add an egg yolk, the sugar syrup with its cargo of orange zest, and a good tbsp of lemon juice - mix it all up well.
Now beat the egg white up till stiff and fold it delicately into the frangipane cream: pretend you're getting a soufflé ready. Which is, more or less, what you're doing. Then roll out (or unroll) a 25cm diameter circle of flaky pastry and spread the frangipane out over it to within an inch of the edge.
At this point, tradition has it that you should stick in either a dried bean or a small porcelain figurine (used to be the baby Jesus but these days you can pick characters from Tintin, the Simpsons and, for all I know, the French national rugby team): when you get around to eating the thing the lucky person who gets the bean is King for the night, and has to host the event next year. I gave up on that early on: the first year someone chipped the enamel on a tooth on the porcelain, and the year after someone actually ate the bean without noticing, so there seemed little point.
Whatever, it's up to you. In any case, brush the edges of the pastry with water, and then unroll the other circle of pastry over the top, and pinch the edges well to seal. Then brush the whole thing with some egg yolk diluted with a bit of milk, and bung it in the oven at 210°C for about 30 minutes. Best eaten warm rather than hot, and please don't stick cream on it.
Tuesday, 29 December 2009
EBELSKIVER

Freakin' spheroidal pancakes. Big deal. How does this novelty dish from your local Danish Culture Heritage Society make it into the hallowed pages of Frangykitchen? Well, it's like this.
A few months ago, my sister gave me some chokecherry syrup, which was given to her by Jim, her ex-boyfriend from when they were in their 20s. The jar was dated 2006 and it was one of the last jars put away by Jim's mom before she died. I remember tagging along as the little brother and visiting with Jim's family in Montana and picking baskets of wild chokecherries, which are astringent and scarcely edible when picked but can become indescribably transcendent as preserves—jam, compote, and syrup. "Can become" is the key here because not all chokecherry preserves are so great. Patsy tells me that Jim sends her chokecherry jams every once in a while (he still lives in Billings), but his are nowhere near as good as his mom's. [Don't tell Jim, though, and I'm counting on the dilution factor of one tiny post in the entirety of the blogosphere to keep this our little secret.] And so this is how I came to possess a very special half-pint jar of seemingly irreproducible delicacy. Maybe someday I'll make it my mission to rediscover the secrets of producing good chokecherry syrup, but for now I just need a worthy means of consuming it. That's part one.
Last week, my mom has me and a couple of friends over for a session of hard labor—moving around furniture, cleaning, etc. and we come across an old box with a nearly brand-spanking new cast-iron ebelskiver pan. Apparently Mom picked it up on one of their trips to Solvang, which is apparently something that my family used to do before I was born. Sure enough, Patsy remembers this, but I don't. No big—I've been to Solvang and know that I didn't miss out on much. I'm not a culture nut and never have been. Mom says that she used the pan exactly twice before putting it into storage. I asked if I could borrow it, and she said I could have it. It looked brand new. There's no way that this pan could have produced decent anything. With no seasoning of the bare metal, any food would stick like crazy.
Cast iron is my favorite cookware for many kinds of foods. Properly seasoned, it browns foods forming a beautiful crust that will generally detach nicely from the surface. So it is relatively non-stick, though in order to achieve this property you need to use adequate fat, the pan needs to be hot, and the cook must be patient, allowing enough time for the crust-forming to occur before moving the food. After cooking and while the pan is still hot, a quick wipe-down is all the cleaning that should occur, and if there is anything sticking to the pan, a bit of hot water can be used to loosen the little crusties before wiping them out. Under no circumstances should this pan be scrubbed with detergent, as this will remove the seasoning.
So what exactly is this seasoning? And faced with a brand-new, bare metal pan, how does one put on this seasoning? In my understanding, the coating is derived mostly from fats from the previous several cookings, chemically altered with heat and exposure to the iron surface so that it bonds with the metal and also thickens and semi-hardens to coat the metal. It's kind of a dynamic coating—each time you cook, a little bit of the fats gets incorporated into the coating while a little bit of the coating is lost by burning off.
To season a new pan, there are several methods, and you can find all of them on the Internet. The one that I have used involves washing the pan very well, coating it with oil and baking it, then letting it cool and repeating the process a few times. The result is a very attractive, shiny, orange-brown coating that in my experience has a tendency to peel at real cast-iron cooking temperatures, and is therefore little better (if not worse) than no coating at all.
My philosophy is that you have to develop the seasoning with use. In the case of the ebelskiver pan, I used a little extra oil in both the pan and the batter, and I just accepted that the first batch would stick until it became over-brown (i.e. burnt, but the dogs didn't mind). The second batch would be a little better. And by the time I put on the third batch of ebelskiver the result would be somewhat edible, which is a good thing because the dogs were getting rather sick of them.
After a week of daily use, the pan is finally seasoned and is making pretty nice ebelskiver. For a really good batter recipe, go to Karen's post on pancakes and follow the instructions, but add a generous tablespoon of melted butter for every 2/3 cup of batter, which should be on the thick side. The pan must be pre-heated over a low fire—hot, though not smoking—and about half a teaspoon of oil in each of the cups should be swirled around before adding the batter.
The trick to cooking ebelskiver is the all-important quarter-turn. Once the batter has had a crusted to a light golden color, I use a wooden skewer to help detach the 'skivers from the pan before giving them a partial turn. The cooked hemispheres should now be vertical with one lip straight up and the other at the bottom of the cup. In the meantime the loose batter should run out to fill the half of the cup that was vacated. At this point they kind of look like three-D pac-men. Once you have a nice crust on the bottom of the pac-men, give them another partial turn so that their mouths are straight down.
Once crusted and golden all over, they are finally ready to take on the syrup made by the now-deceased mother of my sister's ex-boyfriend.
Thursday, 24 December 2009
FOIE GRAS
TAMALES*
As much as fried foods are drenched in Hanukkah tradition (see my previous post), no food speaks out the "reason for the Xmas season" as boldly as the tamale. Maybe it's just me. Being neither Jewish nor Christian, maybe I find myself looking for a meaningful anchor in the holiday season other than a baby in a pig trough unknowingly destined to becoming the most insidious icon of zombie worship in human history. Whatever. I just like good tamales, and truly good tamales are practically impossible to come by unless you make them yourself.
A tamale (and I shall use "tamale" for the singular rather than the more proper "tamal," just because) consists of an inedible skin of some kind—I will use corn husk, or hoja, but I've seen banana leaves used to great effect as well as parchment—wrapped around a cylinder of corn-based dough, the masa, which is filled with something truly tasty. There are no constraints on what one can use as tamale filling. Karen's froggy readers may be tempted to incorporate lardons and duck confit, while those in Kiwiland will want to try a lamb concoction or perhaps chopped-up pavlova for a dessert tamale. While I have no problems with innovation, the pork-and-red-chile mixture is both classic and (to me) the best. For anyone crazy enough to jump into the culture of tamale-making from having read just this post, I strongly recommend starting by mastering the red chile tamales. Later on you can do your cherry and foie gras tamale wrapped in fig leaf (which I think could be delicious!).
There are three parts to the process of tamale-making: preparation of the masa, preparation of the filling, and assembly/cooking. Not one of them is particularly easy, although short cuts are available.
"Masa regular" is dough made from corn, water and lye and is available at most Mexican supermarkets (especially during the holiday season) as well as at your local tortilleria. This is what you use to make your own corn tortillas at home—take a ball of the stuff right from the package (it's the consistency of Play-Doh), smash it flat in your tortilla press and cook on a hot comal (I use a cast iron skillet). But for tamales, the cooked masa needs to be soft and fluffy rather than sturdy and chewy (which are desirable qualities in corn tortillas), and so we need a transubstantiation even more profound than the Roman Catholic conversion of communion crackers into the body of the boy in the pig trough. No mysticism is required here, though. This transformation takes place with the addition of prodigious quantities of lard (which is said to work in mysterious ways. Mm hmm.)
Ten pounds of masa to three pounds of lard comes out about right. I'll add a handful of sea salt as well, and then start to mix. This part is a lot of work unless you have some kind of giant machine doing it for you (I don't). You have to mix it really well, and even then the masa isn't quite finished yet—a bit of juice from the roast pork will be added to soften the masa just before the assembly step.
I mentioned that there are short cuts, and the one that might make some sense is to purchase the masa pre-mixed with lard and water, ready-to-use for tamale-making. Personally, I don't go for this, as I want better control over the mixture. I find that the pre-mixed masa cooks up too dry (not enough lard), too salty, and flavorless because they use plain water instead of jus from a roast to soften the dough. Taste just the masa from any large-scale tamale production (even the "home-made" tamale sellers) and you'll know what I mean.
The filling requires a lot of roasted pork and a chile base. I start by cutting a large pork shoulder into slabs and sprinkling the meat liberally with kosher salt and dry rub consisting of cayenne, garlic powder and onion powder. Into a roasting pan and into the oven at 350°F for a couple of hours, turning every so often. When it's kinda brown and has had a chance to braise a bit in its own juices, pull the meat out of the oven and put the meat pieces onto a plate to cool and strain the pan juices—you'll need this to finish the masa.
For red-chile tamale filling the only kind of chile is the kind from New Mexico. Other varieties—California included—are more prone to discoloration and can result in a tamale filling that is more brown than red, which is a visual disappointment. I start by popping the stem end off of the chile, checking for mold, and shaking out most of the seeds—no need to be anal about this. Then a quick toast on each side in a smoking hot iron skillet, and then into a pot with a head's worth of garlic cloves. Just enough water to cover, then simmer for about half an hour, pushing the chiles under continually—the point here is to rehydrate them.
Now fish the chiles out with tongs, letting the water drain back into the pan. Throw out the water, which should have a good bit of dirt that came off the chiles. Blend the chiles with some clean water, the garlic (fished out from the chile water) until fairly smooth. Run this through a food mill to get rid of all those nasty bits of skin as well as any remaining seeds. What you should have now is a chile puree that is thick and beautifully bright red. Put this into a large sauté pan or wok with a slug of lard, and "fry" the sauce for a bit. Add ground cumin and ground oregano (not a lot of either, but about twice as much cumin as oregano) and salt to taste. The flavor should be brilliant.
Back to the pigmeat. I'm assuming it's cooked and cooled by this point. Separate the muscle from the fat, and throw the fat out. Cut the meat into cubes and with your bare hands crush the cubes to separate out the muscle fibers and break the pieces into smaller bits—remember that you can't use gigantic hunks of meat in tamales—and drop the meat into the red chile. Mix it all well and taste it. Add seasonings to make it perfect.
If you're like me, you are dead tired after all this, and so you put off the last (and most time-consuming) step for the day after. Before retiring, however, you should do a final mix on a bit of masa—just enough to make one tamale (complete with filling and hoja) and cook it. There's going to be a lot of time invested into these tamales, and if further adjustment is necessary, now is the time to find out (as opposed to after having made a few dozen). This is also a good time to take the hojas out of their packaging for an overnight soak in hot tap water.
The hojas need to be cleaned of debris, such as dried corn silk, under running water. Toss out any leaves that are mildewy, ripped, holy (I meant as in "with holes," but you can throw out any Holy leaves you find as well) or otherwise defective. Frugal people will try to make use of all the leaves, but hell these things are cheap. Buy an extra bag and throw out the cheesy ones. Put the clean hojas vertically to drain—just make sure to use them before they dry out.
Put some of the masa you worked so hard to mix into a bowl. Add a bit of the meat juice—it helps if you warm this up some—and mix. The idea here is to soften the masa into a more workable consistency so that it's easier to spread onto the hoja. Should be about like a heavy hummus. Or if you do work around the house, like a nice spreadable plaster.
The actual making of the tamale is the part where this whole entire project finally has some meaning. It takes some skill—think of this as a warm-up for the sushi rolls I'll eventually be posting here. You have to spread the right amount and right thickness of masa to completely enclose the filling, allowing for the small amount of oozing that will occur in both directions once you start to shape the roll into a cylinder. After the rolling is complete, put the "seam" up and tuck the tapered side of the hoja under, leaving no airspace between the fold and the masa.
The first ones may come out with too much masa or uneven filling—that's okay. Just steam them up right away and take them to your neighbors, who will be flabbergasted by your industry and generosity. With any luck this may buy you an extra two weeks before they start complaining again about the dogs barking.
Oh—and another thing about the tamale assembly, and this is very important. Don't invite or even allow anyone to help you. It's way more work to oversee someone else's tamale-making than it is to make several dozen on your own. After a brief learning curve, your tamales will become perfectly cylindrical, consistent in size, and beautiful reflections of the person who has had a hand in every step of their creation, unlike what you would get from some last-minute interloper who is joining the party just when it becomes fun. So yeah, humbug, I guess. Ignore this advice at your own peril.
For as long as the masa is raw, the tamales should be kept in a more or less vertical pose. They should also be steamed with the open side up—about 50 minutes—but you can place them horizontally after they are cooked and the masa is set. Tamales are at their best moments after they come from the pot. If you make very large tamales (mine are definitely on the thin side with relatively more filling and less masa than what is typical), additional cooking time may be necessary. Uncooked masa is just gross-tasting. If you're not sure about cooking time, throw in an extra tamale or two to pull out as a tester—be aware that right out of the steamer, fully cooked masa will be softer than what you might expect, but it will still taste cooked.
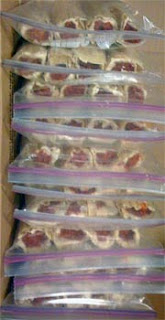
Uncooked tamales freeze very nicely. Share generously with people you care about, and put away a bunch for later. Steaming hot tamales will be delightful for those days when the weather outside is frightful.


